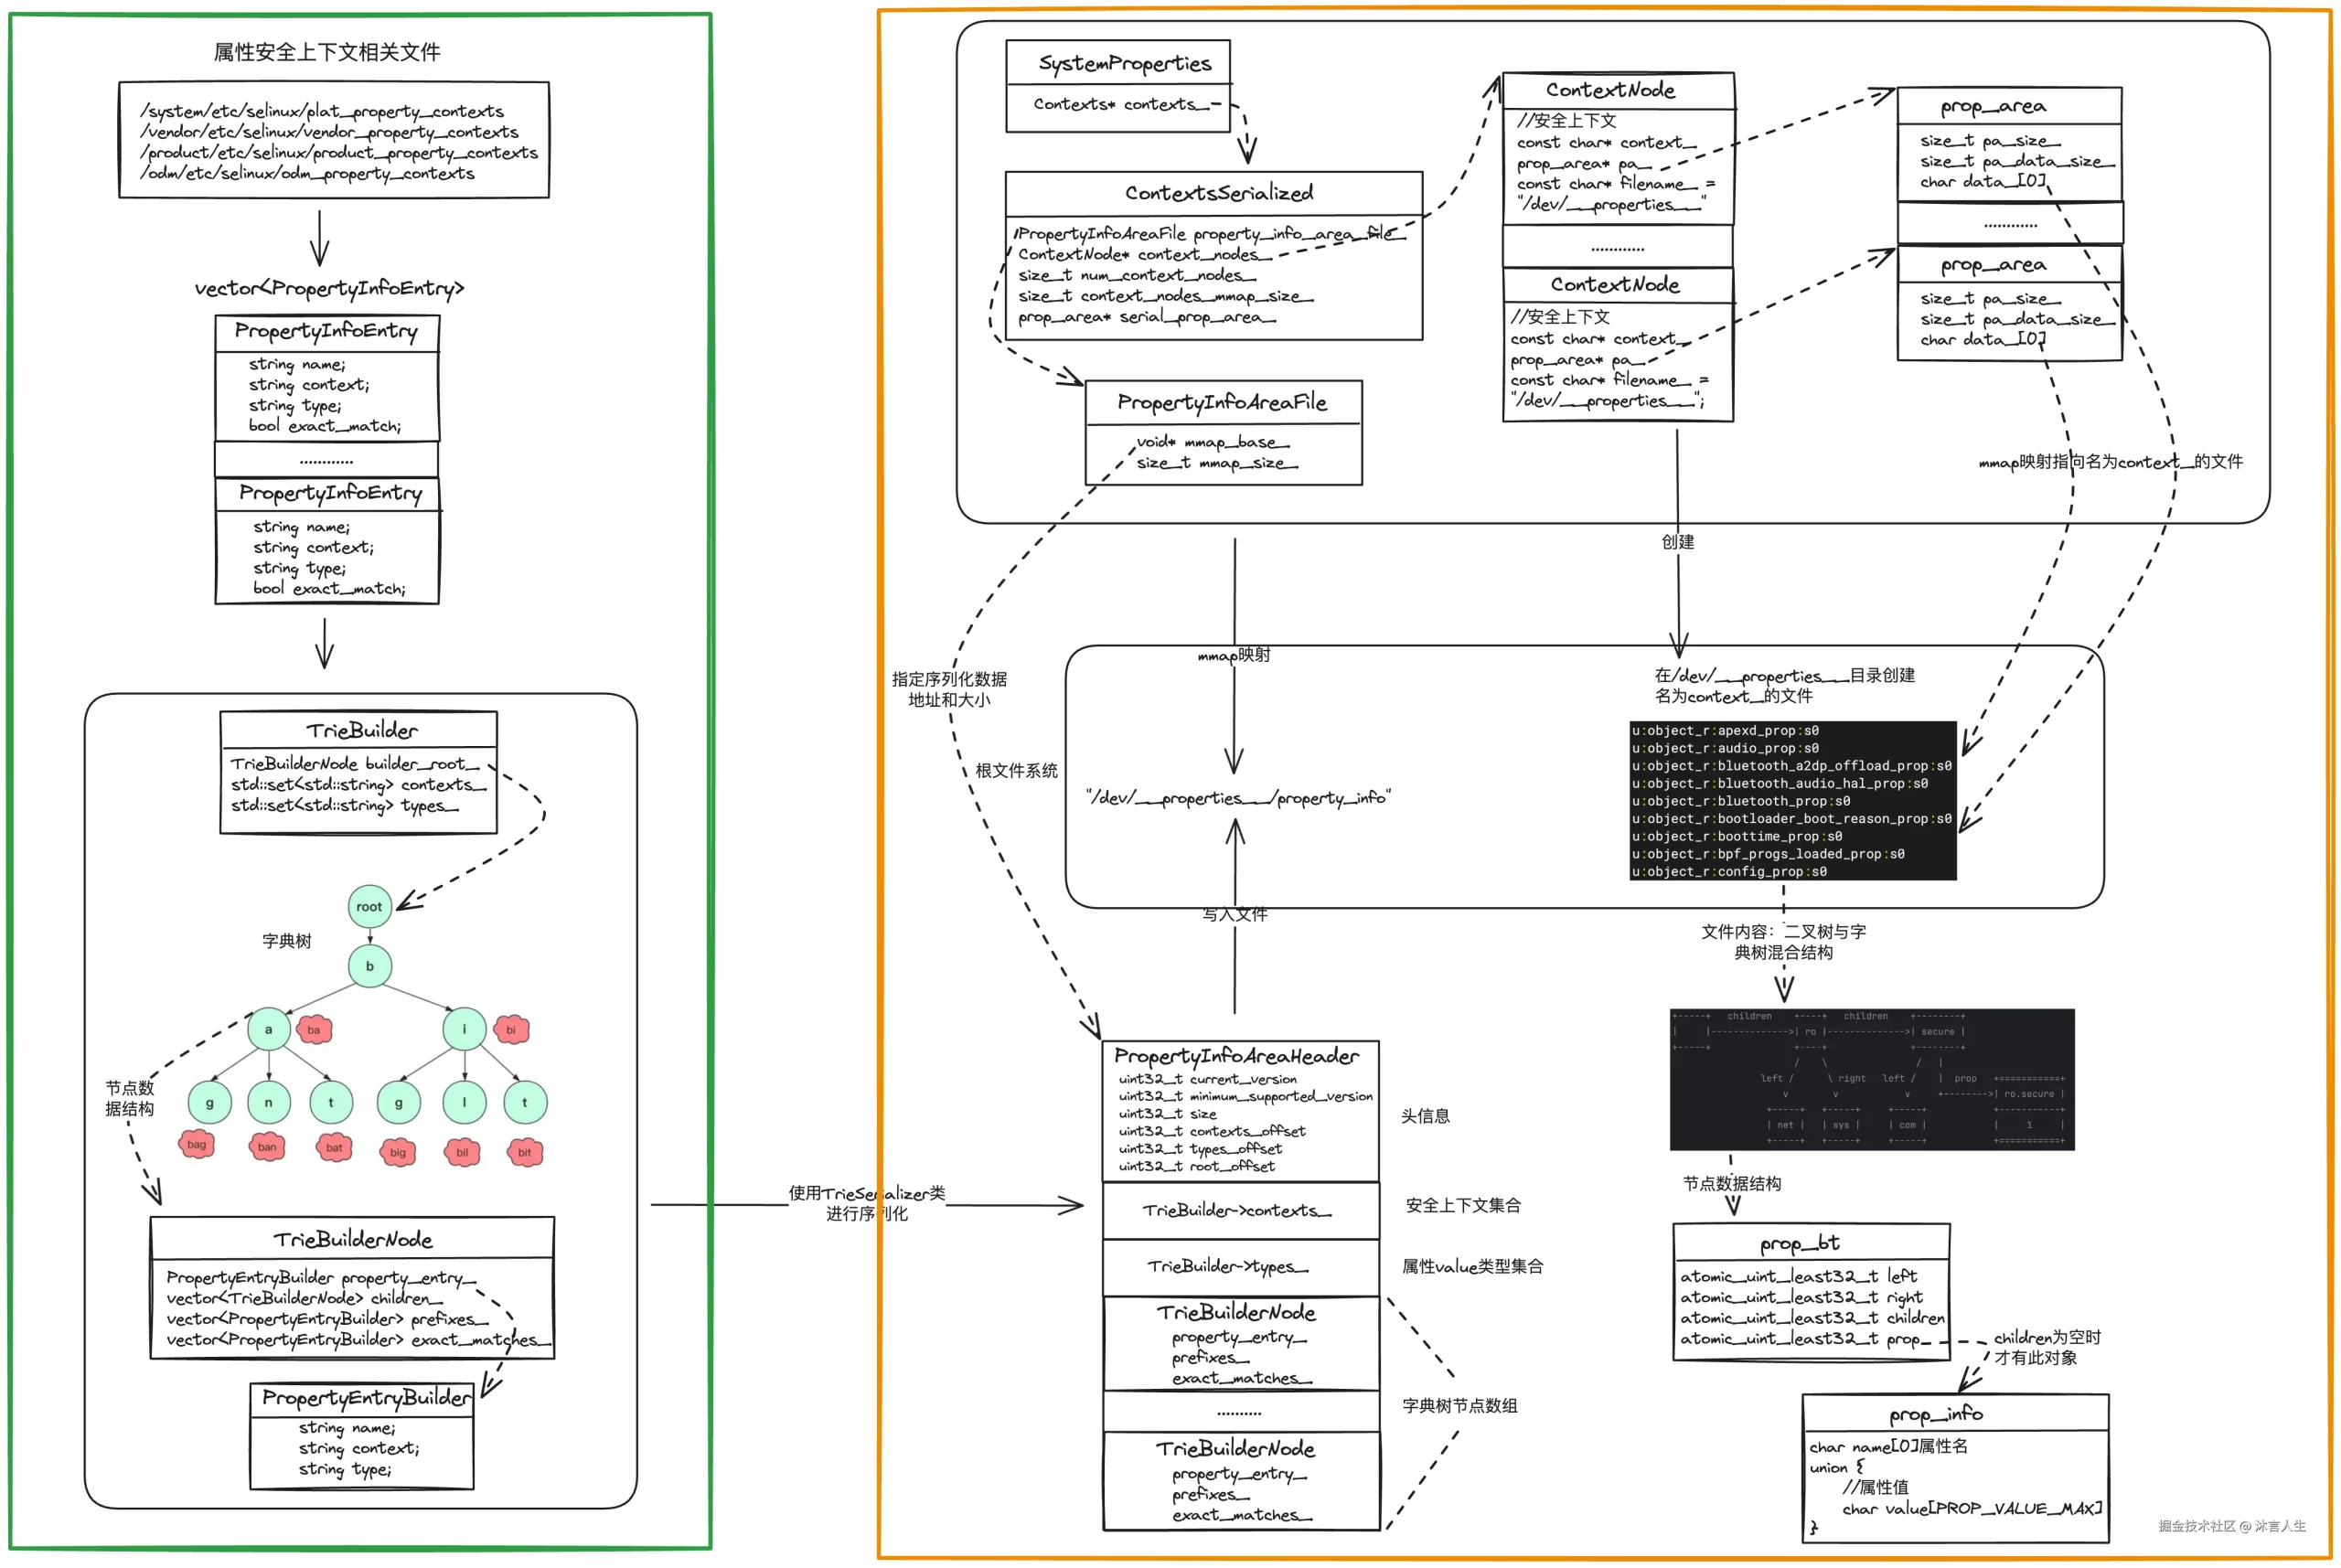
本章主要讲“属性文件创建和mmap映射”,现给出完整数据流程图

上一章中讲解了上图左侧”属性安全上下文序列化”,右侧部分就是“属性文件创建和mmap映射“做的工作,入口代码为__system_property_area_init
void property_init() {
    mkdir("/dev/__properties__", S_IRWXU | S_IXGRP | S_IXOTH);
    CreateSerializedPropertyInfo();
    if (__system_property_area_init()) {
        LOG(FATAL) << "Failed to initialize property area";
    }
    if (!property_info_area.LoadDefaultPath()) {
        LOG(FATAL) << "Failed to load serialized property info file";
    }
}

bionic/libc/include/sys/_system_properties.h
#define PROP_FILENAME "/dev/__properties__"


__BIONIC_WEAK_FOR_NATIVE_BRIDGE
int __system_property_area_init() {
  bool fsetxattr_failed = false;
  return system_properties.AreaInit(PROP_FILENAME, &fsetxattr_failed) && !fsetxattr_failed ? 0 : -1;
}
可以看到__system_property_area_init是调用到system_properties.AreaInit,system_properties实际是图中SystemProperties对象,它是一个大管家对象,它又如下作用:
- 通过它里面的contexts_可以找到所有属性文件的映射地址,然后访问它们
- system_property_api.cpp文件中所有API接口其实都是调用SystemProperties对象中相关接口
在源码中并没有看到system_properties实例创建的地方,通过其注释我们可以窥见端倪
class SystemProperties {
 public:
  friend struct LocalPropertyTestState;
  friend class SystemPropertiesTest;


  SystemProperties() = default;

  explicit SystemProperties(bool initialized) : initialized_(initialized) {
  }
}
可见system_properties实例是由libc调用初始化的。
bool SystemProperties::AreaInit(const char* filename, bool* fsetxattr_failed) {
  if (strlen(filename) >= PROP_FILENAME_MAX) {
    return false;
  }
  strcpy(property_filename_, filename);

  contexts_ = new (contexts_data_) ContextsSerialized();
  if (!contexts_->Initialize(true, property_filename_, fsetxattr_failed)) {
    return false;
  }
  initialized_ = true;
  return true;
}
在AreaInit方法中又调用了ContextsSerialized->Initialize
注意:第一个参数为writable为true表示可写的,这是一个比较重要的参数
bool ContextsSerialized::Initialize(bool writable, const char* filename, bool* fsetxattr_failed) {
  filename_ = filename;
  if (!InitializeProperties()) {
    return false;
  }

  if (writable) {
    mkdir(filename_, S_IRWXU | S_IXGRP | S_IXOTH);
    bool open_failed = false;
    if (fsetxattr_failed) {
      *fsetxattr_failed = false;
    }

    for (size_t i = 0; i < num_context_nodes_; ++i) {
      if (!context_nodes_[i].Open(true, fsetxattr_failed)) {
        open_failed = true;
      }
    }
    if (open_failed || !MapSerialPropertyArea(true, fsetxattr_failed)) {
      FreeAndUnmap();
      return false;
    }
  } else {
    if (!MapSerialPropertyArea(false, nullptr)) {
      FreeAndUnmap();
      return false;
    }
  }
Initialize完成了橙色框中上面部分的工作:
- 加载”/dev/properties/property_info”文件的内容(前一章属性安全上下文序列化的内容)
- 创建ContextNode数组
- 创建属性文件,并mmap映射属性文件,地址保存到ContextNode中
加载property_info
bool ContextsSerialized::InitializeProperties() {

  if (!property_info_area_file_.LoadDefaultPath()) {
    return false;
  }

  .....省略代码

  return true;
}


bool PropertyInfoAreaFile::LoadDefaultPath() {
  return LoadPath("/dev/__properties__/property_info");
}

bool PropertyInfoAreaFile::LoadPath(const char* filename) {
  int fd = open(filename, O_CLOEXEC | O_NOFOLLOW | O_RDONLY);

  auto mmap_size = fd_stat.st_size;

  void* map_result = mmap(nullptr, mmap_size, PROT_READ, MAP_SHARED, fd, 0);
  if (map_result == MAP_FAILED) {
    close(fd);
    return false;
  }

  auto property_info_area = reinterpret_cast(map_result);
  if (property_info_area->minimum_supported_version() > 1 ||
      property_info_area->size() != mmap_size) {
    munmap(map_result, mmap_size);
    close(fd);
    return false;
  }

  close(fd);
  mmap_base_ = map_result;
  mmap_size_ = mmap_size;
  return true;
}
- 使用mmap映射”/dev/properties/property_info”
- 然后让PropertyInfoAreaFile->mmap_base_指向这块内存区域的起始地址
- 然后让PropertyInfoAreaFile->mmap_size_指向这块内存区域的大小
这样后续就可以通过PropertyInfoAreaFile类操作里面的文件了。
创建ContextNode数组
bool ContextsSerialized::InitializeProperties() {
  .....省略代码


  if (!InitializeContextNodes()) {
    FreeAndUnmap();
    return false;
  }

  return true;
}

bool ContextsSerialized::InitializeContextNodes() {
  auto num_context_nodes = property_info_area_file_->num_contexts();
  auto context_nodes_mmap_size = sizeof(ContextNode) * num_context_nodes;

  void* const map_result = mmap(nullptr, context_nodes_mmap_size, PROT_READ | PROT_WRITE,
                                MAP_PRIVATE | MAP_ANONYMOUS, -1, 0);
  if (map_result == MAP_FAILED) {
    return false;
  }

  prctl(PR_SET_VMA, PR_SET_VMA_ANON_NAME, map_result, context_nodes_mmap_size,
        "System property context nodes");

  context_nodes_ = reinterpret_cast(map_result);
  num_context_nodes_ = num_context_nodes;
  context_nodes_mmap_size_ = context_nodes_mmap_size;

  for (size_t i = 0; i < num_context_nodes; ++i) {
    new (&context_nodes_[i]) ContextNode(property_info_area_file_->context(i), filename_);
  }

  return true;
}
- 先从PropertyInfoAreaFile中读取映射数据结构中num_contexts数量,其实就是图中的TrieBuilder->contexts数组
- 然后映射分配了num_context_nodes个ContextNode大小的空间
- 让ContextsSerialized.context_nodes_指向映射空间的起始地址
- 让ContextsSerialized.num_context_nodes_指向映射空间ContextNode的个数
- 让ContextsSerialized.context_nodes_mmap_size_指向映射空间的大小
- 最后初始化每个ContextNode的context(安全上下文)和filename,filename是在前面__system_property_area_init函数中调用时传入的”/dev/properties“
创建属性文件
bool ContextsSerialized::Initialize(bool writable, const char* filename, bool* fsetxattr_failed) {
  .....省略代码

  if (writable) {
  .....省略代码
    for (size_t i = 0; i < num_context_nodes_; ++i) {
      if (!context_nodes_[i].Open(true, fsetxattr_failed)) {
        open_failed = true;
      }
    }

  } else {
    if (!MapSerialPropertyArea(false, nullptr)) {
      FreeAndUnmap();
      return false;
    }
  }
  return true;
}
循环遍历context_nodes_数组调用open方法创建属性文件
context_nodes_[i].Open(true, fsetxattr_failed)


bool ContextNode::Open(bool access_rw, bool* fsetxattr_failed) {
  lock_.lock();
  if (pa_) {
    lock_.unlock();
    return true;
  }

  char filename[PROP_FILENAME_MAX];
  int len = async_safe_format_buffer(filename, sizeof(filename), "%s/%s", filename_, context_);
  if (len < 0 || len >= PROP_FILENAME_MAX) {
    lock_.unlock();
    return false;
  }

  if (access_rw) {
    pa_ = prop_area::map_prop_area_rw(filename, context_, fsetxattr_failed);
  } else {
    pa_ = prop_area::map_prop_area(filename);
  }
  lock_.unlock();
  return pa_;
}
- 先构建属性文件的文件名格式为/dev/properties+context_(安全上下文名称)
- access_rw为ture,表示以可读写的方式映射这个属性上下文(在属性服务框架中讲过init进程是唯一可以修改属性的进程,所以是可读写的方式映射)
constexpr size_t PA_SIZE = 128 * 1024;

prop_area* prop_area::map_prop_area_rw(const char* filename, const char* context,
                                       bool* fsetxattr_failed) {

  const int fd = open(filename, O_RDWR | O_CREAT | O_NOFOLLOW | O_CLOEXEC | O_EXCL, 0444);

  if (fd < 0) {
    if (errno == EACCES) {

      abort();
    }
    return nullptr;
  }

  if (context) {
    if (fsetxattr(fd, XATTR_NAME_SELINUX, context, strlen(context) + 1, 0) != 0) {
      async_safe_format_log(ANDROID_LOG_ERROR, "libc",
                            "fsetxattr failed to set context (%s) for "%s"", context, filename);

      if (fsetxattr_failed) {
        *fsetxattr_failed = true;
      }
    }
  }

  if (ftruncate(fd, PA_SIZE) < 0) {
    close(fd);
    return nullptr;
  }

  pa_size_ = PA_SIZE;
  pa_data_size_ = pa_size_ - sizeof(prop_area);

  void* const memory_area = mmap(nullptr, pa_size_, PROT_READ | PROT_WRITE, MAP_SHARED, fd, 0);
  if (memory_area == MAP_FAILED) {
    close(fd);
    return nullptr;
  }

  prop_area* pa = new (memory_area) prop_area(PROP_AREA_MAGIC, PROP_AREA_VERSION);

  close(fd);
  return pa;
}
- 创建属性文件
- fsetxattr为创建的属性文件设置安全上下文
- 然后映射属性文件,大小为128k
- prop_area->data指向文件映射的起始地址
- 最后将ContextNode->pa_指向prop_area
prop_area->pa_size_:整个prop_area数据结构的大小(包含data[0])
prop_area->pa_data_size_:prop_area->data[0]可用最大空间
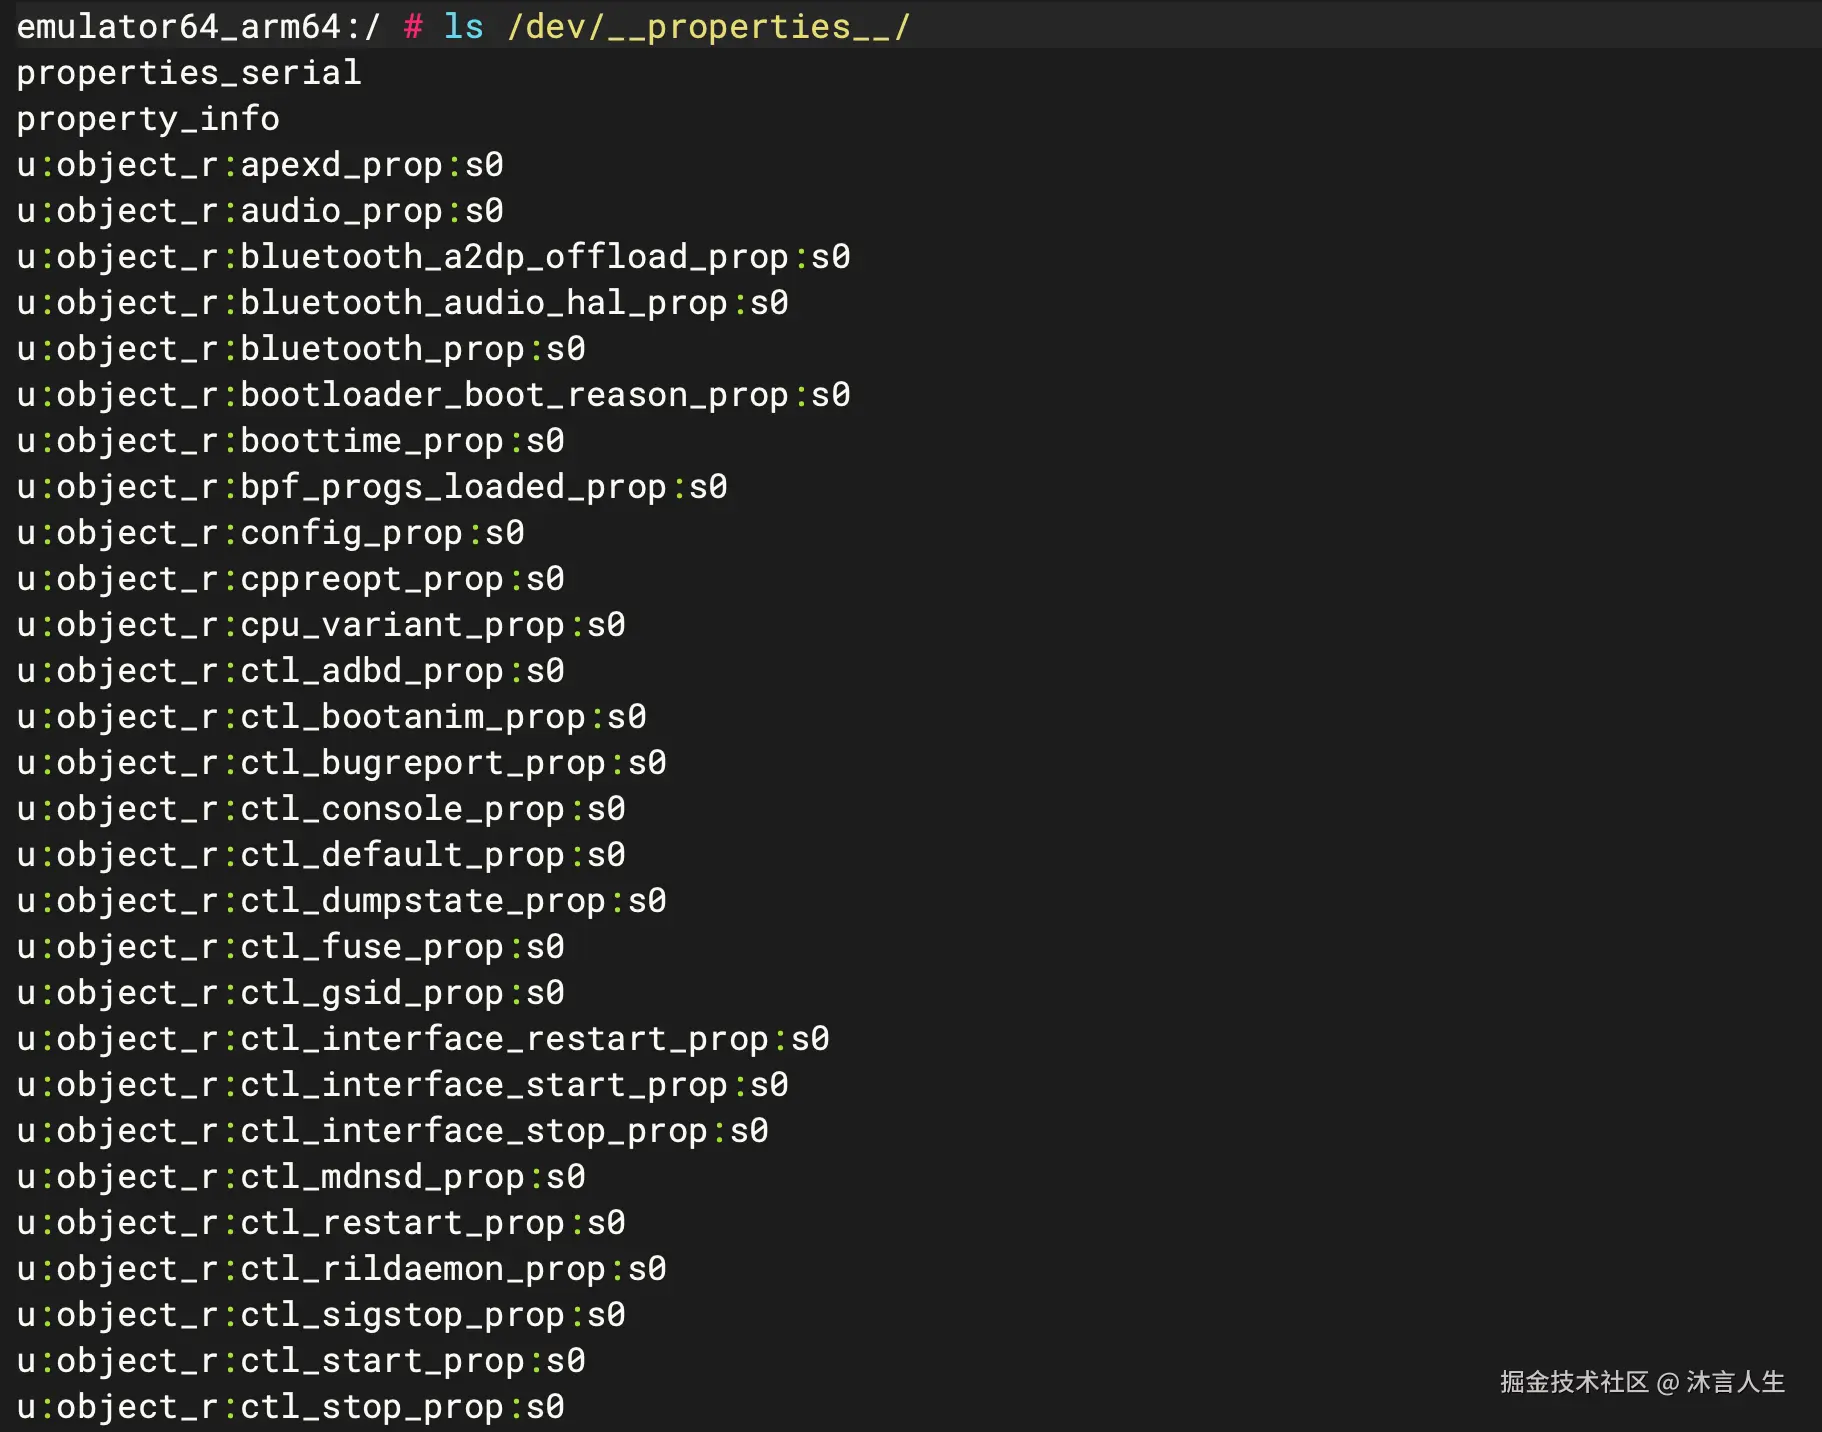
在/dev/__properties__下创建的属性文件如下

到此为止完整数据流程图中右侧的主要数据结构都构建完成,只剩下属性文件的数据了。
阅读全文
下载说明:
1、本站所有资源均从互联网上收集整理而来,仅供学习交流之用,因此不包含技术服务请大家谅解!
2、本站不提供任何实质性的付费和支付资源,所有需要积分下载的资源均为网站运营赞助费用或者线下劳务费用!
3、本站所有资源仅用于学习及研究使用,您必须在下载后的24小时内删除所下载资源,切勿用于商业用途,否则由此引发的法律纠纷及连带责任本站和发布者概不承担!
4、本站站内提供的所有可下载资源,本站保证未做任何负面改动(不包含修复bug和完善功能等正面优化或二次开发),但本站不保证资源的准确性、安全性和完整性,用户下载后自行斟酌,我们以交流学习为目的,并不是所有的源码都100%无错或无bug!如有链接无法下载、失效或广告,请联系客服处理!
5、本站资源除标明原创外均来自网络整理,版权归原作者或本站特约原创作者所有,如侵犯到您的合法权益,请立即告知本站,本站将及时予与删除并致以最深的歉意!
6、如果您也有好的资源或教程,您可以投稿发布,成功分享后有站币奖励和额外收入!
7、如果您喜欢该资源,请支持官方正版资源,以得到更好的正版服务!
8、请您认真阅读上述内容,注册本站用户或下载本站资源即您同意上述内容!
原文链接:https://www.dandroid.cn/archives/22452,转载请注明出处。


评论0