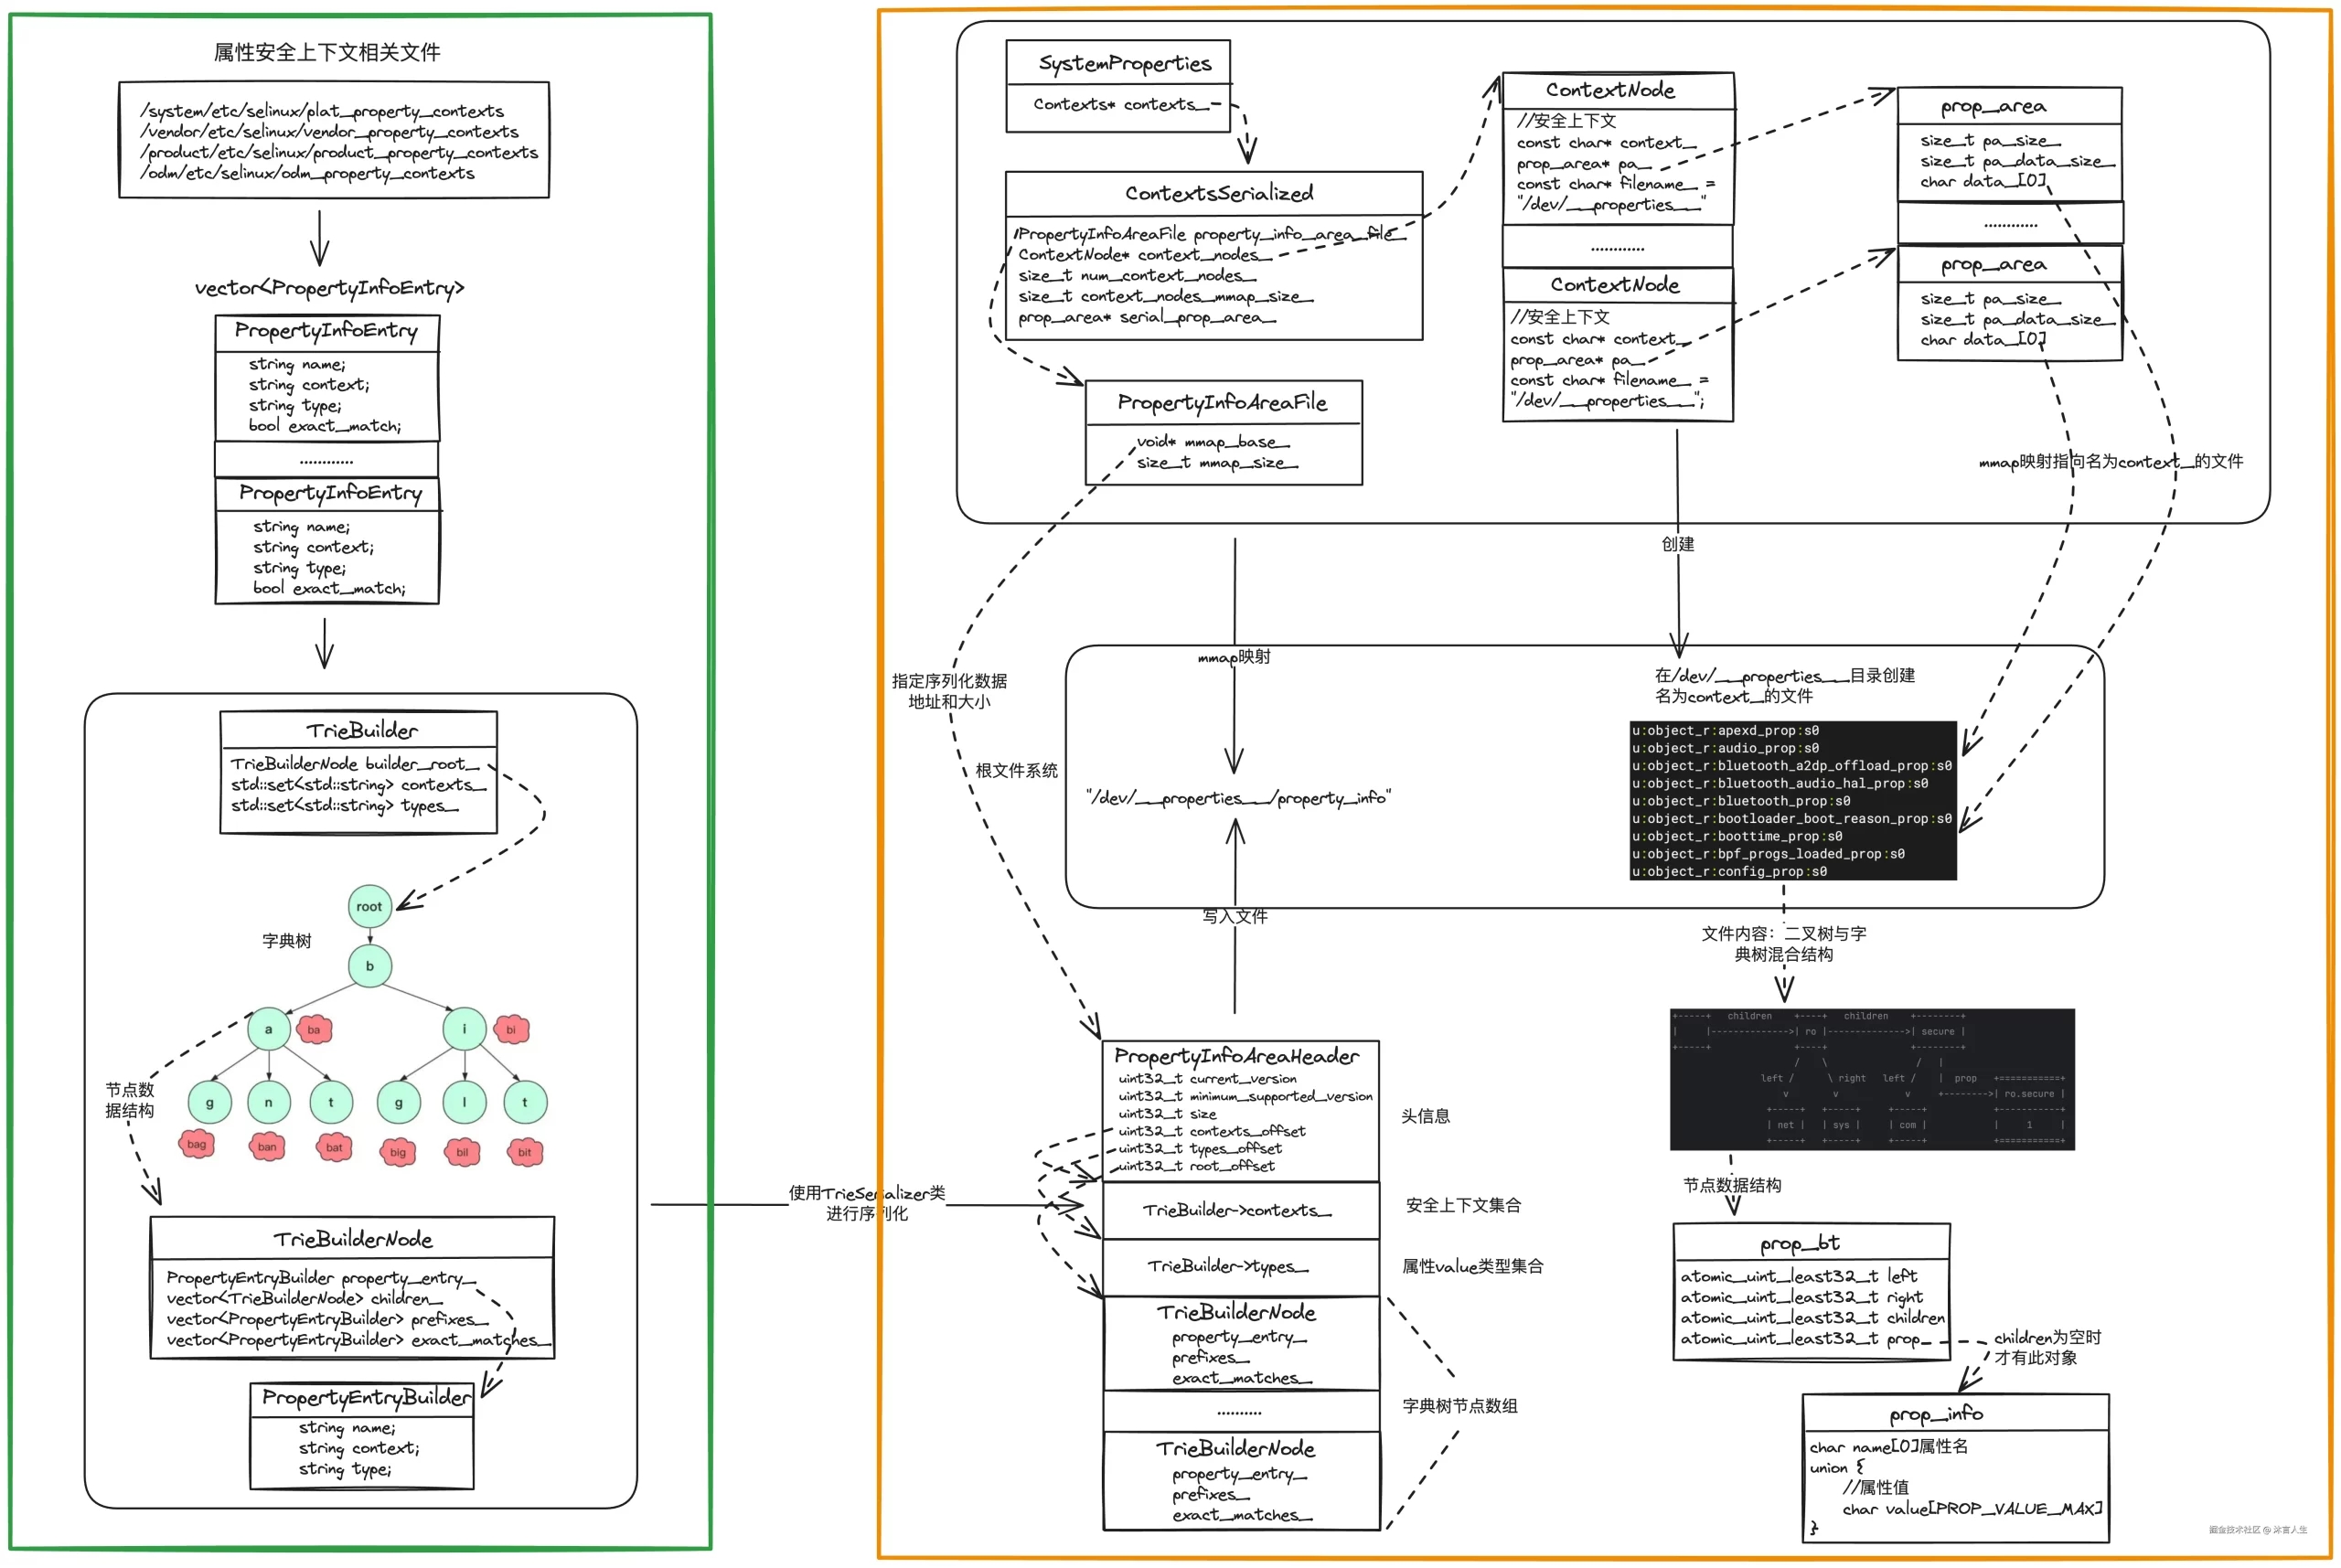
本章主要讲“属性值初始化”,先给出完整数据流程图

属性值初始化核心内容:
- 属性值哪儿来
- 以怎样的方式写入属性文件
int SecondStageMain(int argc, char** argv) {
    process_kernel_dt();
    process_kernel_cmdline();
    export_kernel_boot_props();
    property_load_boot_defaults(load_debug_prop);
}
属性值初始化阶段由如下几个函数实现,其中property_load_boot_defaults最为重要,因此以它为切入点进行讲解。
void property_load_boot_defaults(bool load_debug_prop) {
    std::map<std::string, std::string> properties;
    if (!load_properties_from_file("/system/etc/prop.default", nullptr, &properties)) {

        if (!load_properties_from_file("/prop.default", nullptr, &properties)) {

            load_properties_from_file("/default.prop", nullptr, &properties);
        }
    }
    load_properties_from_file("/system/build.prop", nullptr, &properties);
    load_properties_from_file("/vendor/default.prop", nullptr, &properties);
    load_properties_from_file("/vendor/build.prop", nullptr, &properties);
    if (SelinuxGetVendorAndroidVersion() >= __ANDROID_API_Q__) {
        load_properties_from_file("/odm/etc/build.prop", nullptr, &properties);
    } else {
        load_properties_from_file("/odm/default.prop", nullptr, &properties);
        load_properties_from_file("/odm/build.prop", nullptr, &properties);
    }
    load_properties_from_file("/product/build.prop", nullptr, &properties);
    load_properties_from_file("/product_services/build.prop", nullptr, &properties);
    load_properties_from_file("/factory/factory.prop", "ro.*", &properties);

    if (load_debug_prop) {
        LOG(INFO) << "Loading " << kDebugRamdiskProp;
        load_properties_from_file(kDebugRamdiskProp, nullptr, &properties);
    }

    for (const auto& [name, value] : properties) {
        std::string error;
        if (PropertySet(name, value, &error) != PROP_SUCCESS) {
            LOG(ERROR) << "Could not set '" << name << "' to '" << value
                       << "' while loading .prop files" << error;
        }
    }

}
- 从各种.prop或.default文件中读取属性,解析到properties中
- 然后调用PropertySet设置属性
static uint32_t PropertySet(const std::string& name, const std::string& value, std::string* error) {
    size_t valuelen = value.size();

    ....省略代码

    prop_info* pi = (prop_info*) __system_property_find(name.c_str());
    if (pi != nullptr) {

        if (StartsWith(name, "ro.")) {
            *error = "Read-only property was already set";
            return PROP_ERROR_READ_ONLY_PROPERTY;
        }

        __system_property_update(pi, value.c_str(), valuelen);
    } else {
        int rc = __system_property_add(name.c_str(), name.size(), value.c_str(), valuelen);
        if (rc < 0) {
            *error = "__system_property_add failed";
            return PROP_ERROR_SET_FAILED;
        }
    }


    if (persistent_properties_loaded && StartsWith(name, "persist.")) {
        WritePersistentProperty(name, value);
    }
    property_changed(name, value);
    return PROP_SUCCESS;
}
- 查找属性是否存在
- 存在更新属性
- 不存在添加属性
- 最后通知属性有更新
我们看看里面重要函数的实现
__BIONIC_WEAK_FOR_NATIVE_BRIDGE
const prop_info* __system_property_find(const char* name) {
  return system_properties.Find(name);
}

__BIONIC_WEAK_FOR_NATIVE_BRIDGE
int __system_property_update(prop_info* pi, const char* value, unsigned int len) {
  return system_properties.Update(pi, value, len);
}

__BIONIC_WEAK_FOR_NATIVE_BRIDGE
int __system_property_add(const char* name, unsigned int namelen, const char* value,
                          unsigned int valuelen) {
  return system_properties.Add(name, namelen, value, valuelen);
}
它们最终都是调用SystemProperties的相关方法,上一篇文章讲过SystemProperties是个大管家类,通过它可以找到你想要任何属性相关的东西。
属性文件内容
这里先介绍一下属性文件中的内容是按什么数据结构存储的:

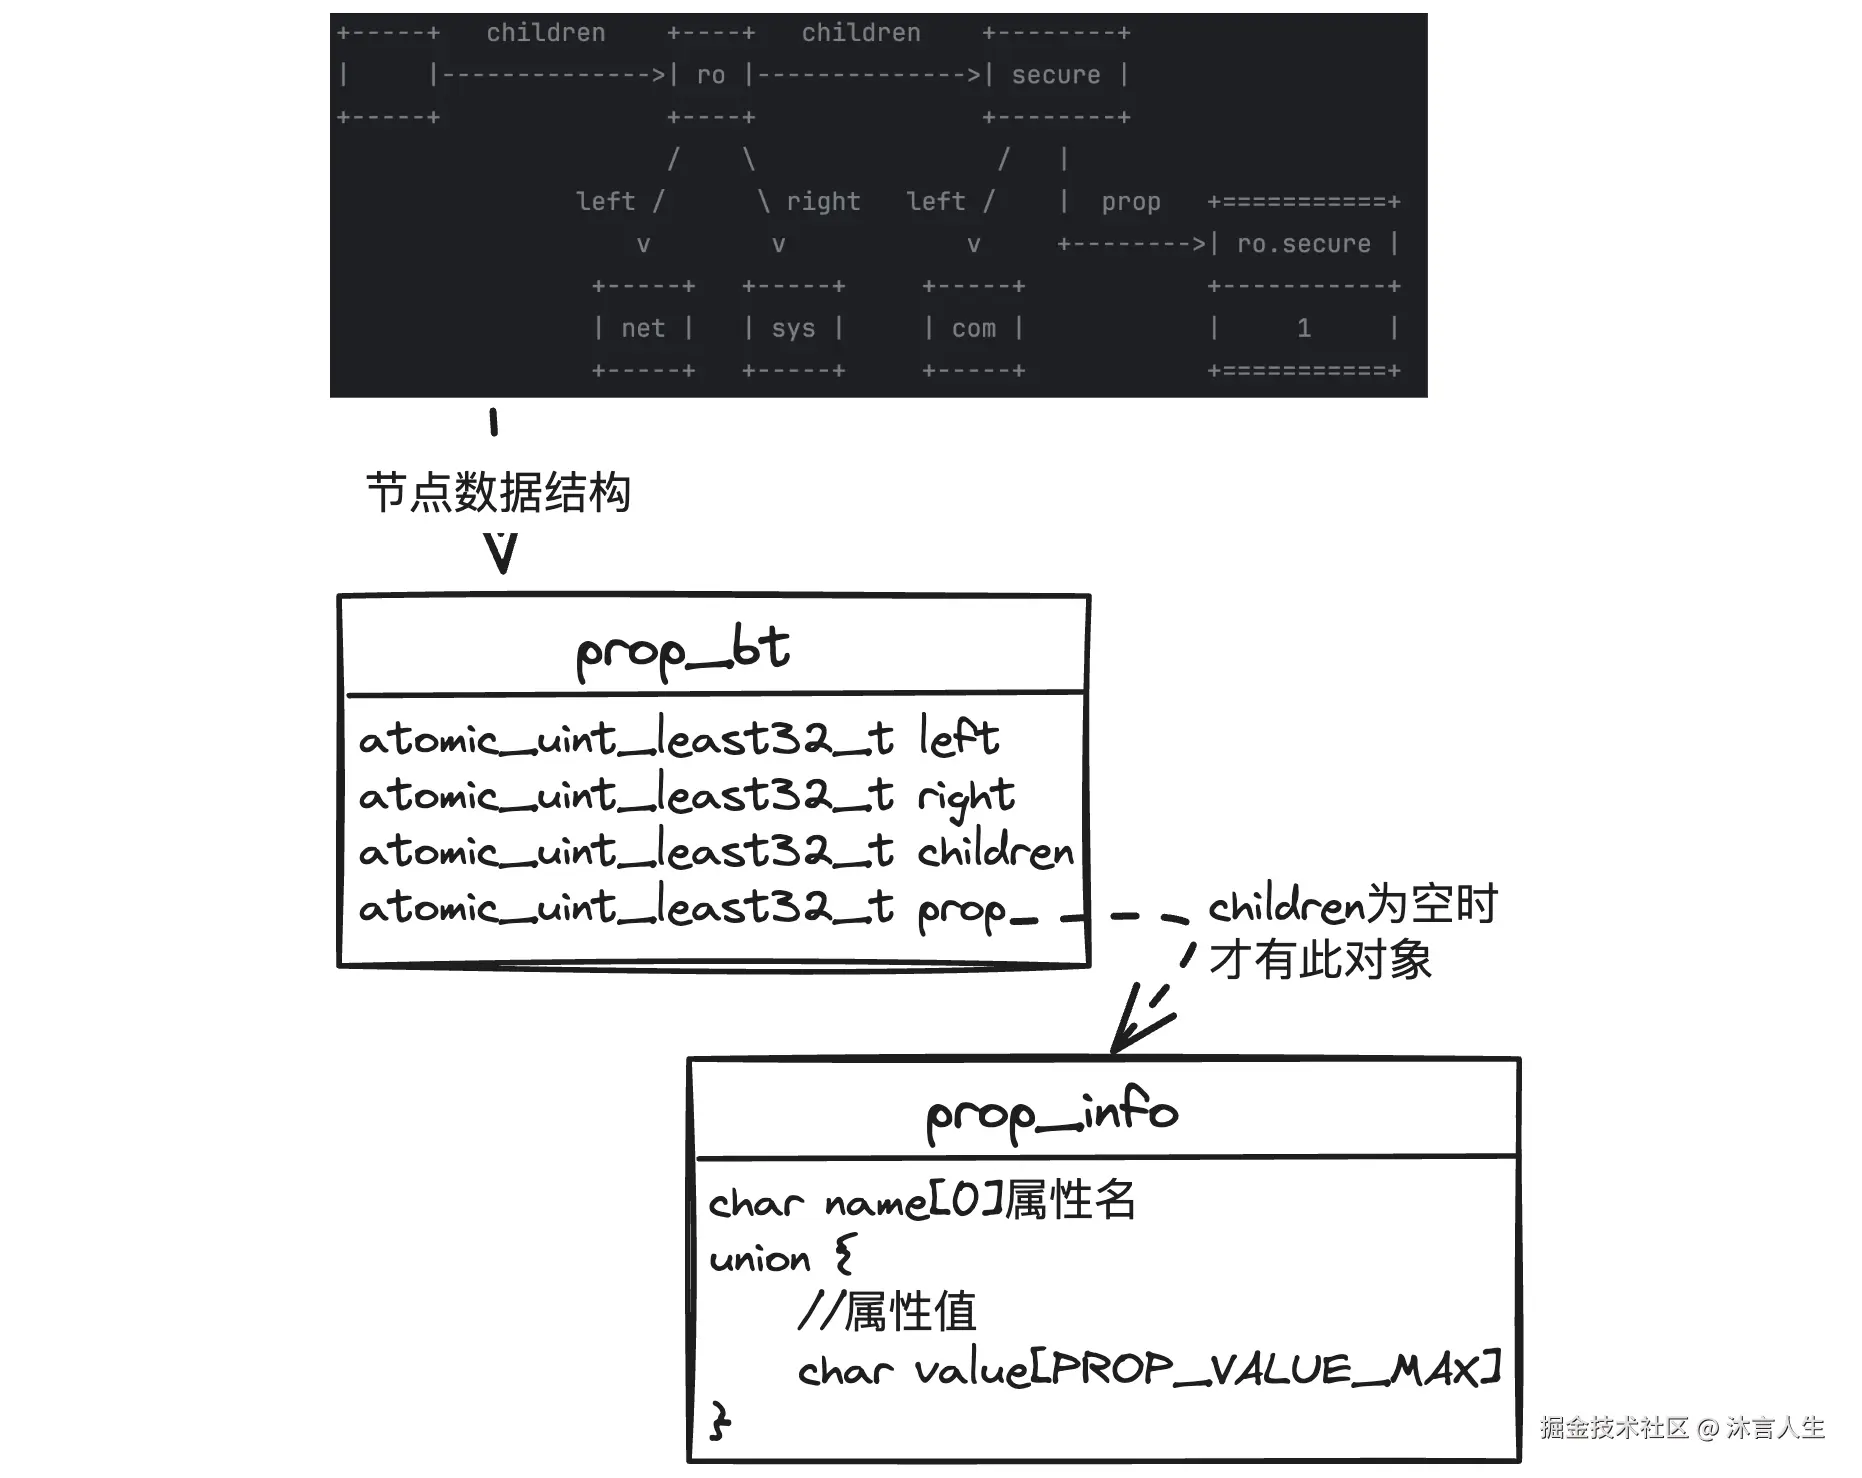
文件的内容以二叉树与字典树混合结构的方式存储属性的,这种结构有如下特点:
ro.secure=1
net
sys
com
- 在传统的二叉树结构中,假如一个节点 node 拥有 left right 两个成员:node { var left, right },其中的 left right 都是 node 这个节点的孩子;而在这个混合结构中,节点 node 的 left、right 和 node 本身其实是平级关系,它们的父节点是同一个
- 以
ro.secure=1来举例。首先对属性名ro.secure以点分割,得ro和secure,先从树上查找到ro,而ro的左右节点sys和net与ro是平级关系。接着,从ro的 child 指向的节点里查找secure,很明显第一个就是。找到了之后,根据节点的prop值指向的一个prop_info结构就能读取到值 - 只有节点prop_bt是属性的最后一项时(例如secure节点),才有prop_info
属性查找
const prop_info* SystemProperties::Find(const char* name) {
  if (!initialized_) {
    return nullptr;
  }

  prop_area* pa = contexts_->GetPropAreaForName(name);
  if (!pa) {
    async_safe_format_log(ANDROID_LOG_ERROR, "libc", "Access denied finding property "%s"", name);
    return nullptr;
  }

  return pa->find(name);
}
SystemProperties类的contexts_起始就是ContextsSerialized对象
- GetPropAreaForName顾名思义就是通过属性名找到对应的prop_area对象,因为prop_area可以读写属性文件
- 然后通过prop_area查找文件中是否包含相同的属性
prop_area* ContextsSerialized::GetPropAreaForName(const char* name) {
  uint32_t index;
  property_info_area_file_->GetPropertyInfoIndexes(name, &index, nullptr);
  if (index == ~0u || index >= num_context_nodes_) {
    async_safe_format_log(ANDROID_LOG_ERROR, "libc", "Could not find context for property "%s"",
                          name);
    return nullptr;
  }
  auto* context_node = &context_nodes_[index];
  if (!context_node->pa()) {


    context_node->Open(false, nullptr);
  }
  return context_node->pa();
}
- property_info_area_file_其实就是PropertyInfoAreaFile,它指向的是TrieSerializer类
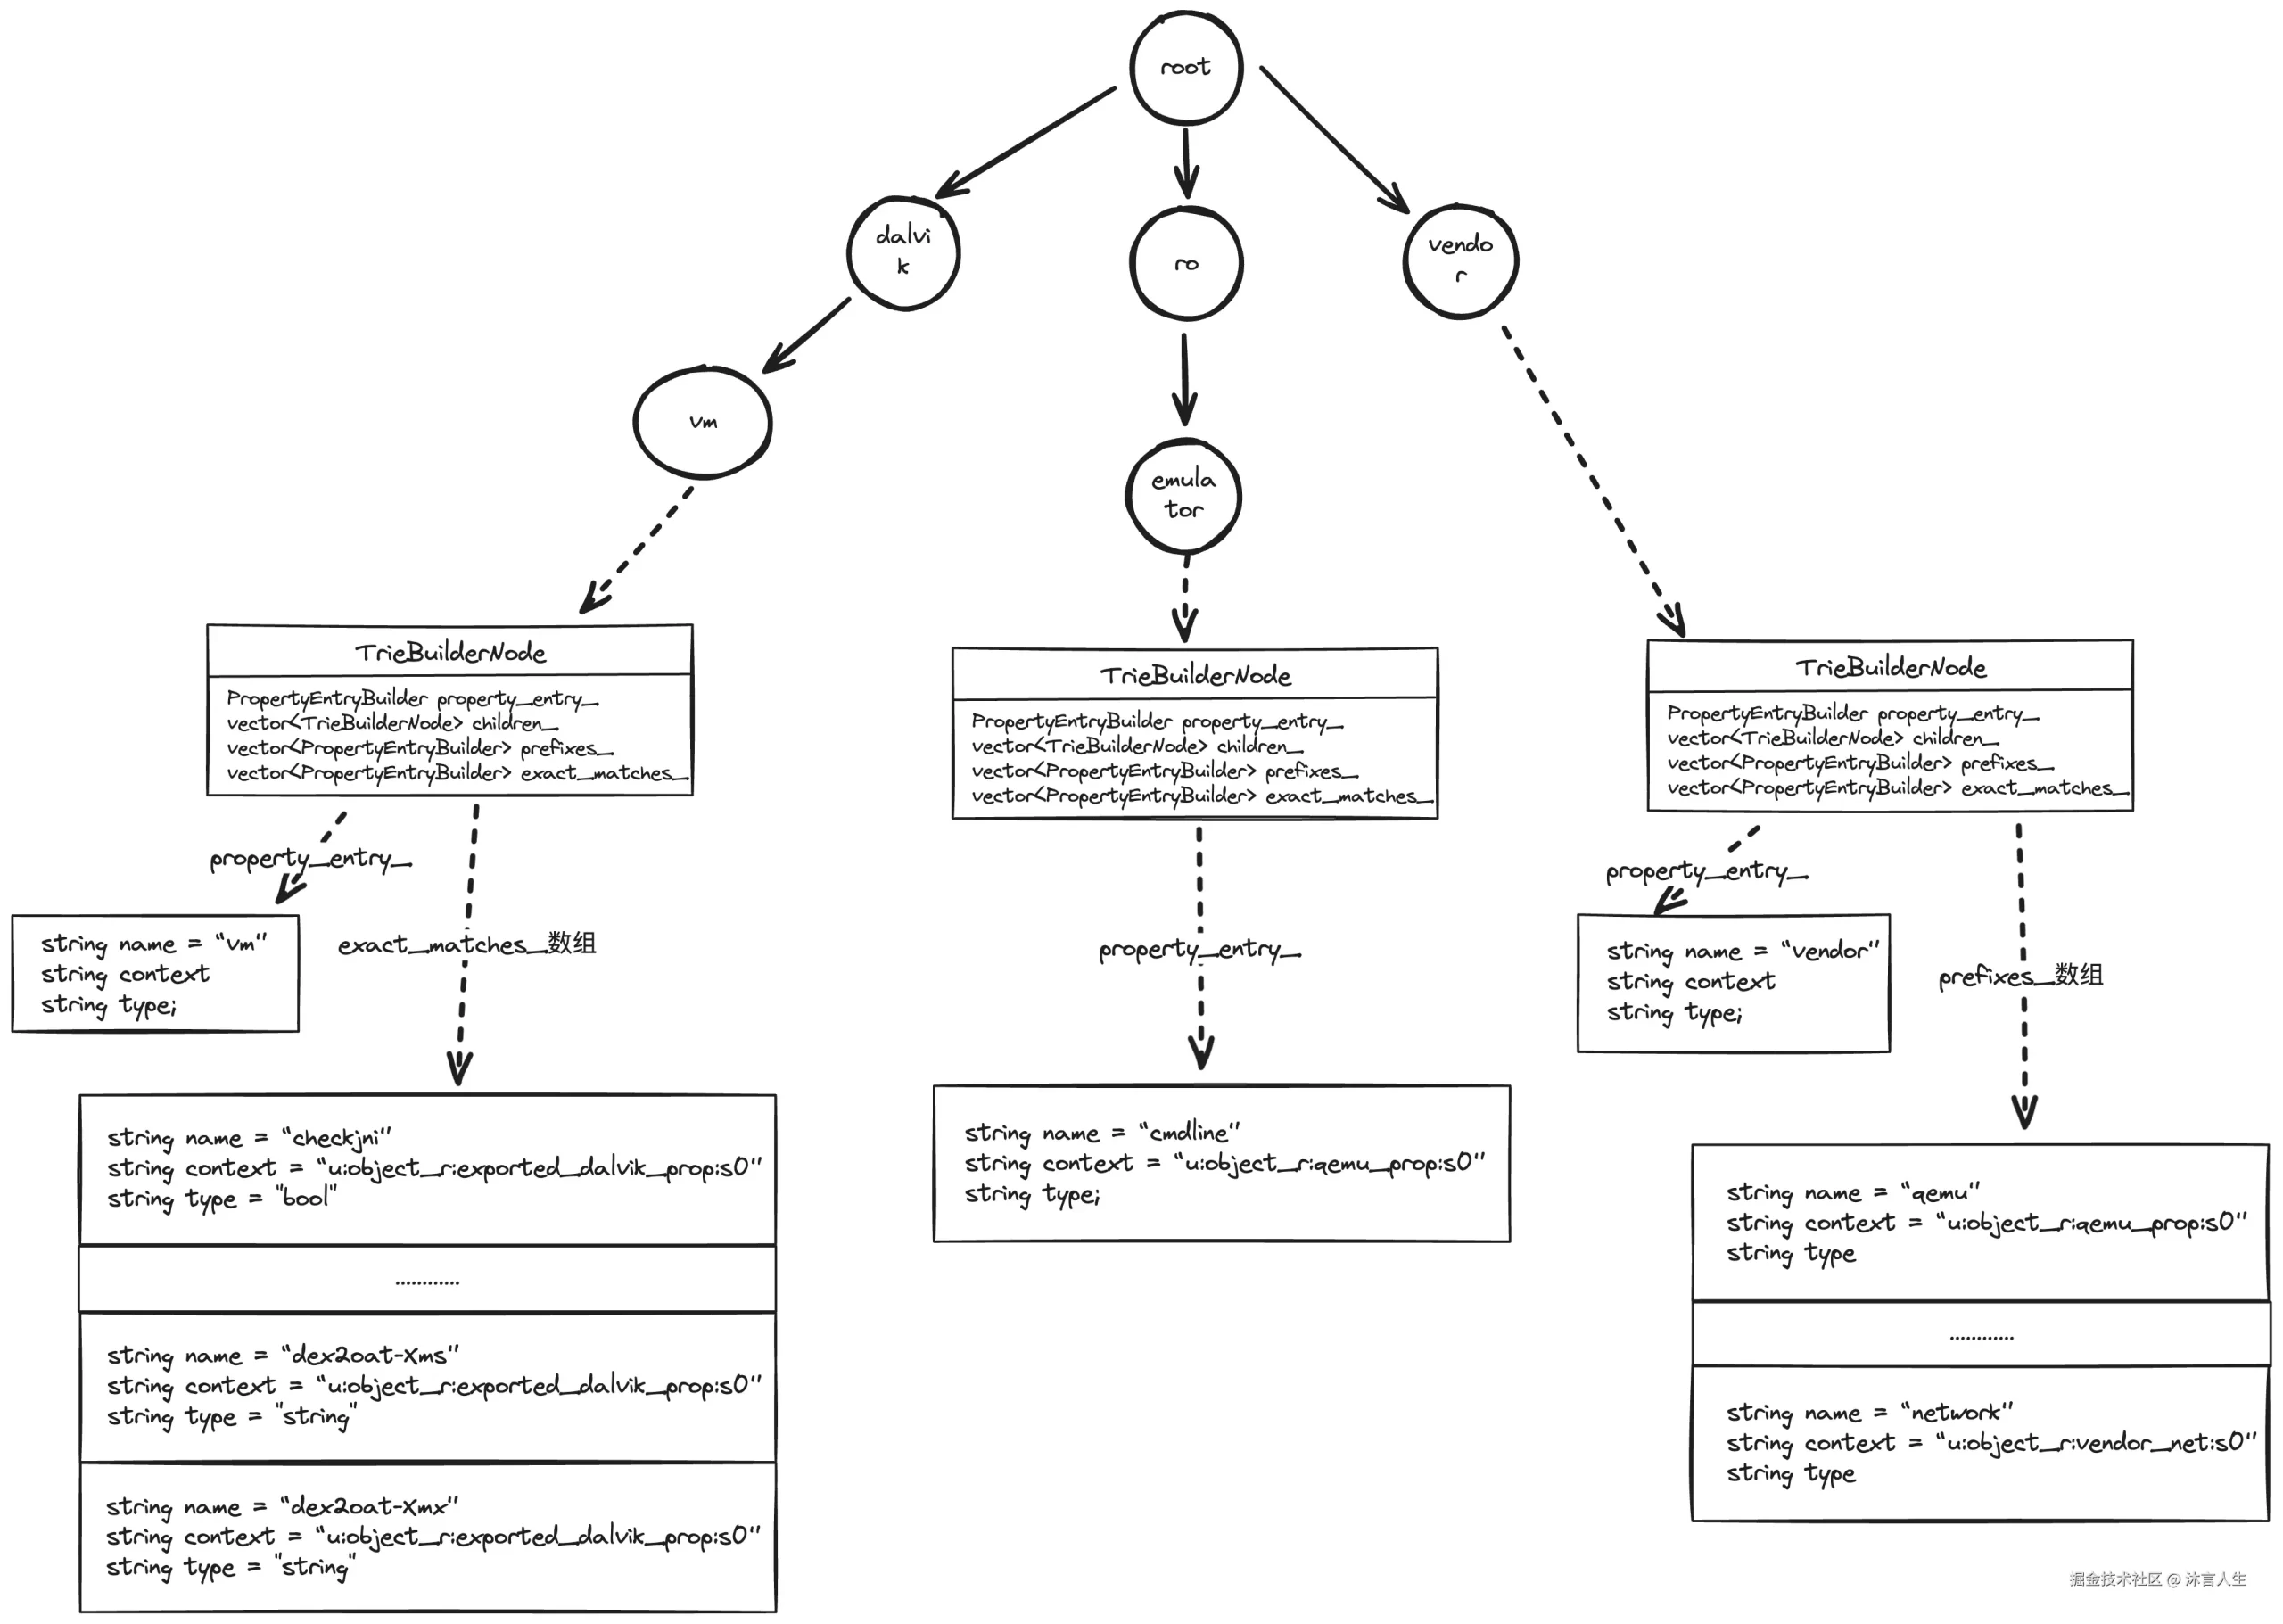
序列化后的数据结构 - GetPropertyInfoIndexes查找字典树节点数组TrieBuilderNode的索引
- 找到索引后就可以找到ContextNode,之所以TrieBuilderNode数组的索引可以在ContextNode数组中使用,是因为ContextNode数组的创建是根据TrieBuilderNode数组创建的(可以看看上一篇文章中"创建ContextNode数组"小节)
- ContextNode->pa_就是prop_area,它指向了属性文件的映射地址
void PropertyInfoArea::GetPropertyInfoIndexes(const char* name, uint32_t* context_index,
                                              uint32_t* type_index) const {
  uint32_t return_context_index = ~0u;
  uint32_t return_type_index = ~0u;
  const char* remaining_name = name;

  auto trie_node = root_node();
  while (true) {
    const char* sep = strchr(remaining_name, '.');


    if (trie_node.context_index() != ~0u) {
      return_context_index = trie_node.context_index();
    }
    if (trie_node.type_index() != ~0u) {
      return_type_index = trie_node.type_index();
    }


    CheckPrefixMatch(remaining_name, trie_node, &return_context_index, &return_type_index);

    if (sep == nullptr) {
      break;
    }

    const uint32_t substr_size = sep - remaining_name;
    TrieNode child_node;

    if (!trie_node.FindChildForString(remaining_name, substr_size, &child_node)) {
      break;
    }

    trie_node = child_node;
    remaining_name = sep + 1;
  }


  for (uint32_t i = 0; i < trie_node.num_exact_matches(); ++i) {
    if (!strcmp(c_string(trie_node.exact_match(i)->name_offset), remaining_name)) {
      if (context_index != nullptr) {
        if (trie_node.exact_match(i)->context_index != ~0u) {
          *context_index = trie_node.exact_match(i)->context_index;
        } else {
          *context_index = return_context_index;
        }
      }
      if (type_index != nullptr) {
        if (trie_node.exact_match(i)->type_index != ~0u) {
          *type_index = trie_node.exact_match(i)->type_index;
        } else {
          *type_index = return_type_index;
        }
      }
      return;
    }
  }

  CheckPrefixMatch(remaining_name, trie_node, &return_context_index, &return_type_index);

  if (context_index != nullptr) *context_index = return_context_index;
  if (type_index != nullptr) *type_index = return_type_index;
  return;
}
- 通过root_offset可以找到字典树节点数组
- 使用点.分割属性名后变为数组,循环遍历查找到数组中倒数第二项
- 遍历倒数第二个节点的exact_match数组,找到与remaining_name同名的数据,type也要保持一致(remaining_name实际就是属性名分割后的最后一项)

然后就是调用pa->find查找属性文件内容
const prop_info* prop_area::find(const char* name) {
  return find_property(root_node(), name, strlen(name), nullptr, 0, false);
}
因为这个查找过程比较复杂,本人也看得不是很透彻,所以就没法详细展开了;这一小部分看不懂起始并不影响我们的学习,大家也可先跳过。
属性添加
int SystemProperties::Add(const char* name, unsigned int namelen, const char* value,
                          unsigned int valuelen) {
  if (valuelen >= PROP_VALUE_MAX && !is_read_only(name)) {
    return -1;
  }

  if (namelen < 1) {
    return -1;
  }

  if (!initialized_) {
    return -1;
  }

  prop_area* serial_pa = contexts_->GetSerialPropArea();
  if (serial_pa == nullptr) {
    return -1;
  }

  prop_area* pa = contexts_->GetPropAreaForName(name);
  if (!pa) {
    async_safe_format_log(ANDROID_LOG_ERROR, "libc", "Access denied adding property "%s"", name);
    return -1;
  }

  bool ret = pa->add(name, namelen, value, valuelen);
  if (!ret) {
    return -1;
  }
- 前面一部分和属性查找一样,调用GetPropAreaForName通过属性名获取到prop_area,这样才能读写属性文件
- 然后调用prop_area->add添加属性
bool prop_area::add(const char* name, unsigned int namelen, const char* value,
                    unsigned int valuelen) {
  return find_property(root_node(), name, namelen, value, valuelen, true);
}
添加和查找都是调用find_property,它们的唯一区别是最后一个参数,add方法传入的true标识可以创建节点。
属性更新
int SystemProperties::Update(prop_info* pi, const char* value, unsigned int len) {
  if (len >= PROP_VALUE_MAX) {
    return -1;
  }

  if (!initialized_) {
    return -1;
  }

  prop_area* pa = contexts_->GetSerialPropArea();
  if (!pa) {
    return -1;
  }

  uint32_t serial = atomic_load_explicit(&pi->serial, memory_order_relaxed);
  serial |= 1;
  atomic_store_explicit(&pi->serial, serial, memory_order_relaxed);


  atomic_thread_fence(memory_order_release);

  strlcpy(pi->value, value, len + 1);

  atomic_store_explicit(&pi->serial, (len << 24) | ((serial + 1) & 0xffffff), memory_order_release);
  __futex_wake(&pi->serial, INT32_MAX);

  atomic_store_explicit(pa->serial(), atomic_load_explicit(pa->serial(), memory_order_relaxed) + 1,
                        memory_order_release);
  __futex_wake(pa->serial(), INT32_MAX);

  return 0;
}
当属性存在时,前面的如下代码已经查找到prop_info,然后传入到Update方法中,这样更新pi->value即可。
prop_info* pi = (prop_info*) __system_property_find(name.c_str());
属性通知
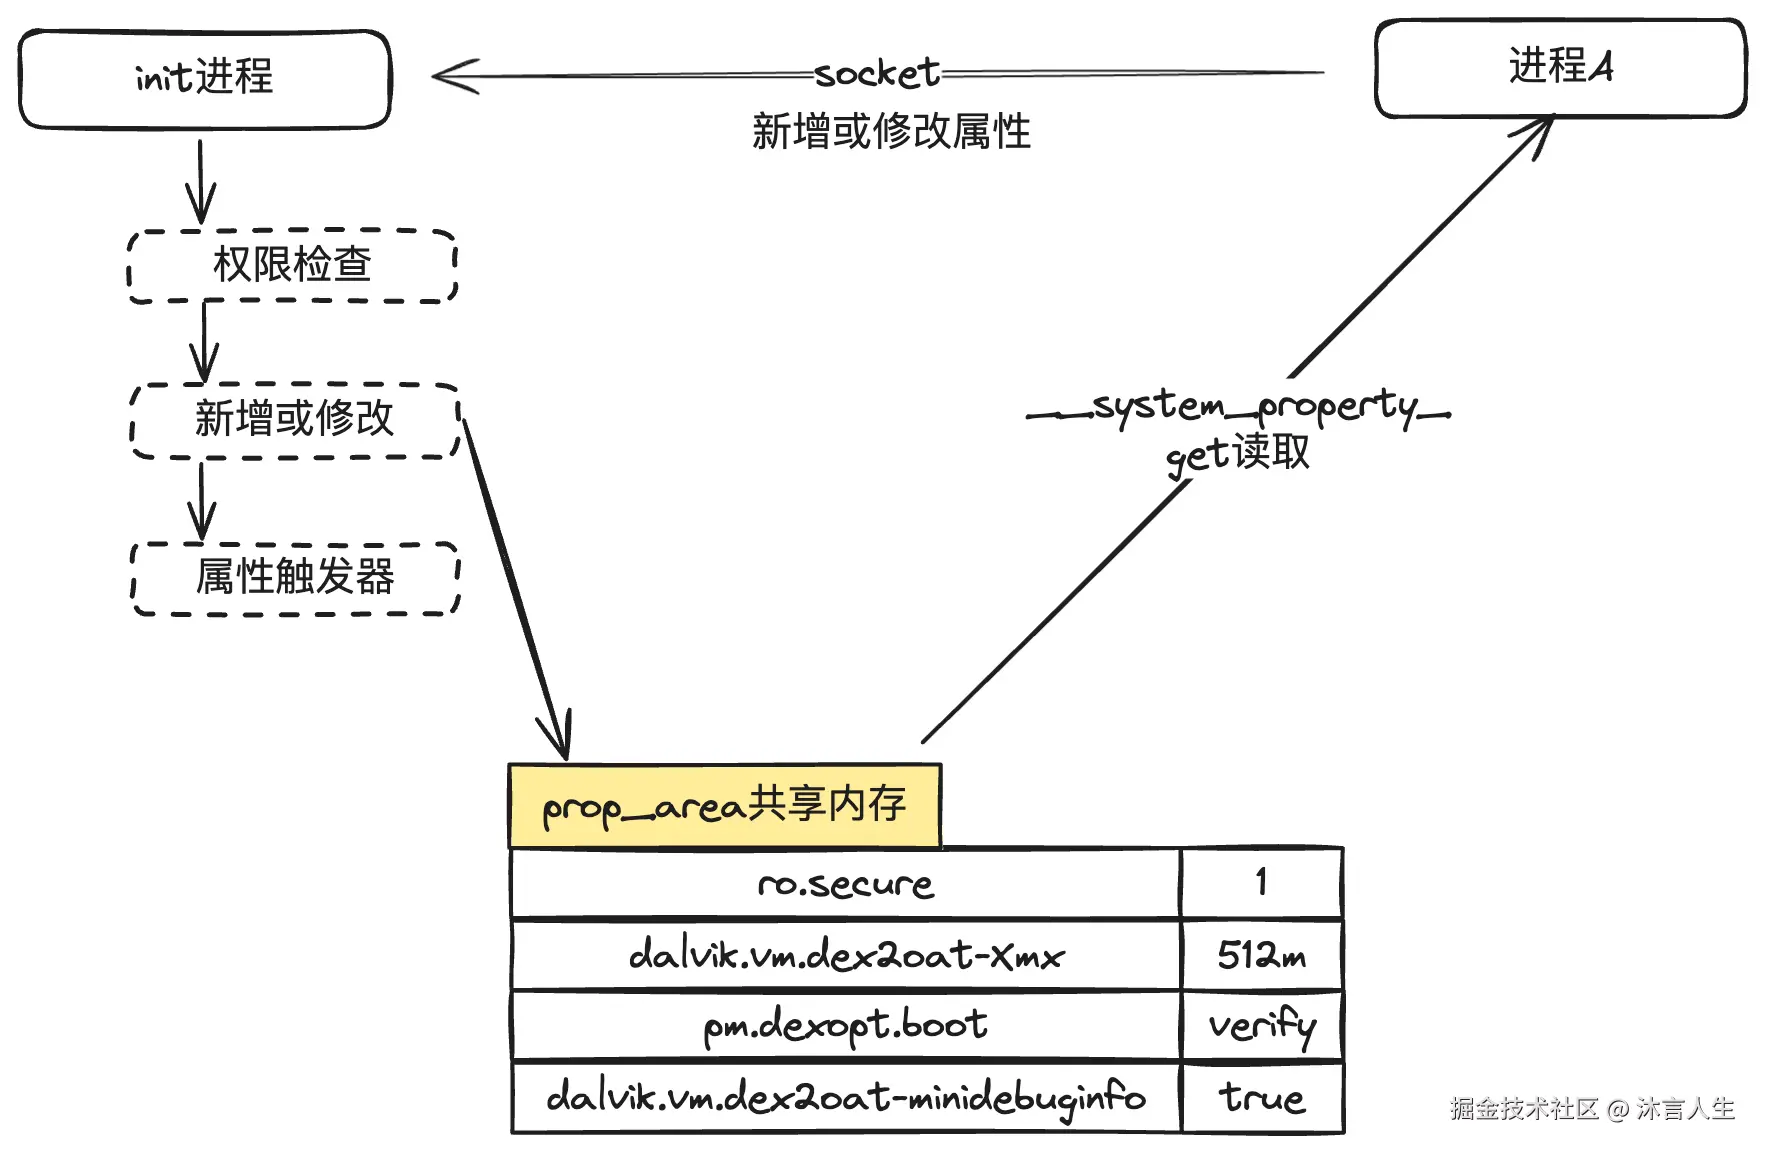
当添加或更新属性时,需要通知系统,因为系统有许多Action时依赖属性值的变化而变化的,就是架构图中的“属性触发器”

static uint32_t PropertySet(const std::string& name, const std::string& value, std::string* error) {
    size_t valuelen = value.size();

    prop_info* pi = (prop_info*) __system_property_find(name.c_str());
    if (pi != nullptr) {

        if (StartsWith(name, "ro.")) {
            *error = "Read-only property was already set";
            return PROP_ERROR_READ_ONLY_PROPERTY;
        }

        __system_property_update(pi, value.c_str(), valuelen);
    } else {
        int rc = __system_property_add(name.c_str(), name.size(), value.c_str(), valuelen);
        if (rc < 0) {
            *error = "__system_property_add failed";
            return PROP_ERROR_SET_FAILED;
        }
    }


    if (persistent_properties_loaded && StartsWith(name, "persist.")) {
        WritePersistentProperty(name, value);
    }

    property_changed(name, value);
    return PROP_SUCCESS;
}

void property_changed(const std::string& name, const std::string& value) {


    if (name == "sys.powerctl") {


        shutdown_command = value;
        do_shutdown = true;
    }

    if (property_triggers_enabled) ActionManager::GetInstance().QueuePropertyChange(name, value);

    if (waiting_for_prop) {
        if (wait_prop_name == name && wait_prop_value == value) {
            LOG(INFO) << "Wait for property '" << wait_prop_name << "=" << wait_prop_value
                      << "' took " << *waiting_for_prop;
            ResetWaitForProp();
        }
    }
}
然后调用QueuePropertyChange通知init进程处理,这部分内容在init进程的配置文件解析中再讲解。
阅读全文
下载说明:
1、本站所有资源均从互联网上收集整理而来,仅供学习交流之用,因此不包含技术服务请大家谅解!
2、本站不提供任何实质性的付费和支付资源,所有需要积分下载的资源均为网站运营赞助费用或者线下劳务费用!
3、本站所有资源仅用于学习及研究使用,您必须在下载后的24小时内删除所下载资源,切勿用于商业用途,否则由此引发的法律纠纷及连带责任本站和发布者概不承担!
4、本站站内提供的所有可下载资源,本站保证未做任何负面改动(不包含修复bug和完善功能等正面优化或二次开发),但本站不保证资源的准确性、安全性和完整性,用户下载后自行斟酌,我们以交流学习为目的,并不是所有的源码都100%无错或无bug!如有链接无法下载、失效或广告,请联系客服处理!
5、本站资源除标明原创外均来自网络整理,版权归原作者或本站特约原创作者所有,如侵犯到您的合法权益,请立即告知本站,本站将及时予与删除并致以最深的歉意!
6、如果您也有好的资源或教程,您可以投稿发布,成功分享后有站币奖励和额外收入!
7、如果您喜欢该资源,请支持官方正版资源,以得到更好的正版服务!
8、请您认真阅读上述内容,注册本站用户或下载本站资源即您同意上述内容!
原文链接:https://www.dandroid.cn/archives/22444,转载请注明出处。


评论0